Tuesday 31 January 2012

Lady Like Laws:Rules To Dining Out


There are certain do’s and dont's when dining out. Things that many of us forget to consider. Below is my ladylike laws guide to dining out:

Arriving. Greet the host kindly. If there is a wait, don’t make a huge fuss. It’s up to you to decide whether or not it’s worth it. Restaurants get busy and it’s not the host’s fault.

Napkins. Once you are seated, place your napkin onto your lap with the crease facing you. If the napkin is particularly large, you may fold it in half again. Never take your drink or begin eating without placing your napkin on your lap. When you leave the table or get up for the restroom, fold your napkin (try to hide any food stains you may have left) and place the napkin to the left side of your place setting. (You can thank the 18th Edition of Emily Post’s Etiquette for these tips.)

Menu signals. When you’re settled in, it’s time to look over the menu. Once you have decided what you want to order, close your menu and place it in front of you—this will signal to the wait staff that you are ready to order.

The wait staff. I think a lot of people forget their manners when it comes to the wait staff at a restaurant. It’s important to be appreciative of their service. After all, isn’t it nice to be attended to? Look your waiter in the eye when ordering or asking for something and always say your please and thank yous!

Table tools. When selecting which utensil to use for each course, start with the outermost utensil and work your way in.

The bread basket. If a breadbasket graces your tabletop, tear off one piece and place it onto your bread plate. If you want to butter your bread, take a pat of butter and put it onto your bread plate so you have your own personal butter stash. Never butter your bread directly from the shared butter dish. It’s rude. Finally, tear your bread into bite size pieces and butter as you go.

Turn it down. Please turn your phone to silent or vibrate when you arrive. And try your very best not to text or talk on your phone throughout the meal. If a call or text is particularly urgent, kindly excuse yourself from the table and take care of matters in the restroom. Furthermore, it’s especially important not to try and draw attention to yourself in a dining setting. Translation: Turn down your volume and speak in a soft, pleasant voice. No yelling, loud gawking or anything other audible missteps that might turn heads.

Mind the purse. Believe it or not, you’re not supposed to hang your purse over the back of your chair. I was pretty surprised to learn this. Apparently, you should either leave it on your lap or place it at your feet. And never, ever put your purse on the table. As for our male counterparts, wallets, keys and phones should not be piled onto the table either.

Um, you have something in your teeth. According to Lizzie Post, make eye contact with the individual and signal by lightly tapping your teeth or mouth. If all else fails, just let them know. I would definitely rather someone tell me, wouldn’t you?

Fin! When you are finished with your meal, rest your utensils diagonally across the plate. This is another key restaurant signal that will alert the wait staff that you are done.


-Sophie.

Monday 30 January 2012

Facial Time...

Welcome all, I hope that you enjoyed your weekend, whatever you got up to. But first I am going to share a little facial that requires little effort, follow these simple steps to glowing skin:

You Will Need:
  • 1 cup of brown sugar
  • 1/2 cup of honey
  • 1 tbsp of milk
Method:

  1. In a bowl, add milk and honey to sugar and stir slowly.
  2. Pat mixture onto skin avoiding the eye area.
  3. Leave the mixture on for 10-20 mins. The mask will not become dry or hard.
  4. Rinse off the mask with warm water.
  5. If you desire you can also soak cotton pads into milk and layer them onto your face for about 5 minuets.
  6. Then rinse off and apply moisturiser (don't forget to put one on that includes SPF, if you are out in the sun).
-Sophie.


Saturday 28 January 2012

Favourite Golden Globes Look

Reese Witherspoon looked great at the Golden Globes. She wore a a deep red colored gown with easy romantic waves.The look is really simple but still so effective at the same time. Personally her look was my favourite, what about you?

-Sophie.

Friday 27 January 2012

Fashion Story Of The Week...

50 kilo dress anyone? Yasmin Le Bon made headlines this week by strutting down the catwalk in the Stephane Rolland number in Paris. I thought carrying around my massive handbag was enough of a workout! Have a fab weekend!


-Sophie

Thursday 26 January 2012

Dolce & Gabbana's 'It' Print

Dolce & Gabbana’s SS12 collection was a floral, fruit and veg (yes, really!) print fest just made for summer holidays. So, while you’re waiting for spring and the chance to break out of your black opaques, why not get a head-start on your new-season wardrobe by snapping up this juicy Dolce tribute from A-list online favourite Lavish Alice. The fruity print and spot-on popping shade has just the right amount of D&G about it to seriously up your style kudos – try it with a printed midi for Dolce’s Italian riviera look, or tuck it into coloured cut-offs for an easy post-beach outfit. Surely that counts as at least one of your five a day?  

  -Sophie
 

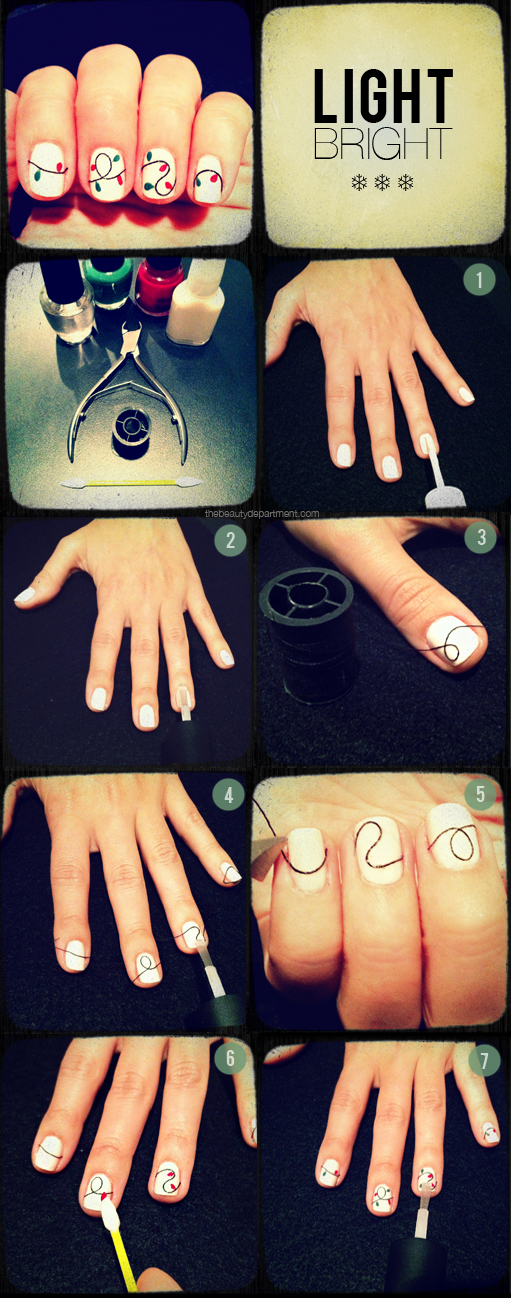
Light Bright Nails

Even though Christmas has gone this is still some great nail art to try! Wanna' have a go, here's how:

  1. On clean nails, do a solid coat (or two thin coats) of white or off white polish.
  2. After the white polish dries, do one clear coat. The string will adhere to this so make sure it’s not too fast drying or too thin of a coat.
  3. Drape black string over the nail and let it loop as you see in the photo. Cut the string about 1/2 inch longer on each side of the nail. Don’t trim it down yet.
  4. Add a thin clear coat on top of the string to secure.
  5. Once that dries, trim the string down using cuticle nippers or small pointy scissors.
  6. Next is the fun part– adding your lights. Pick any colour's you want!
  7. Last, do one coat of a quick drying clear polish.
-Sophie.

Missoni Nails

If you combine my love of chevron patterns with my love of color, you get Missoni. Since the famous italian fashion house doesn’t make nail decals, I figured I’d give “Missoni Nails” a shot!  Why don't you!

-Sophie.

Wednesday 25 January 2012

Get Gorgeous: Say Yes To Winter SPF

It's no secret SPF is essential during the summer months. But did you know it's equally important during the wintertime? Oh, what’s that? You work inside all day so you don't need sunscreen? Not so fast…it’s important for you too!

UV rays are just as harmful during the winter as they are in the summertimeeven if you spend your days working indoors, hidden from the sunshine. UVA rays penetrate window glass, which means you are exposed during your commute and if your office is filled with natural light. UV rays are especially harmful in snowy conditions since rays are strengthened due to the reflective nature of snow. The same goes for cloudy days. So lather up ladies!

All of these forms of exposure contribute to something called “photoaging.” Photoaging is a process of aging caused by UVA and UVB exposure. Major symptoms of photoaging include spider veins on the face or neck, loss of color and fullness in lips and wrinkle formations on the face, neck, ears, hands or chest. No thank you! (Note: You may want to think twice about those hands on the sunny steering wheel too because hands and necks show the symptoms of photoaging the most.) Since even the slightest bits of exposure add up quickly, it’s important to protect any uncovered skin with a broad spectrum UVA and UVB lotion with a minimum SPF of 15.

 Apply it to your face, neck and hands. If you’re looking for a quality SPF, I suggest buying something with one or more of the following ingredients:
  • B3: It aids in skin renewal and helps to improve your skins natural moisture barrier.
  • Lycopene: Helps improve your skin’s “natural protection against ultraviolet radiation.”
  • Hyaluronic Acid: Restores water content, elasticity and firmness to your skin.
  • Vitamin C: This antioxidant helps reduce the appearance of sun damage and increases skin’s moisture. 
  • Katafray Bark: This ingredient is full of natural moisturizing properties.
  • Argan Oil: Repairs sun damage and keeps skin looking radiant and smooth.
-Sophie.

My Top 5 Volumising Mascaras

Fotolia_23743391_xs

Top 5 Volumising Mascaras

With so many volumising mascaras on the market it is hard to know which to choose especially since the prestige brands come with premium price tags. Many luxury brand volume mascaras have been known to clog and stick lashes together, which of course is not the desired effect and certainly not what you expect from the price. Here, having tried many, I take my pick of the top 5 dramatic look, volume mascaras currently on the market. To decide which mascara I liked best, I weighed up the following: what its brand advertises it to do, what it actually does, its price, packaging and staying-power.

1. Hypnose – Lancome

Hypnose is my  favourite everyday volumising mascara.

2. Opulash – M.A.C Cosmetics

For big bouffant lashes at an affordable price, look no further than M.A.C's new Opulash.

3. Diorshow Extase – Christian Dior

Christian Dior have got their dramatic look mascaras down to a T and I just couldn't resist putting the new Extase in my top 5.

4. Elizabeth Arden – Double Density Mascara

Elizabeth Arden's Double Density Mascara would be my fourth choice of volume mascara for me.

5. Diorshow Black Out – Christian Dior

Perfect for a night on the town is every show girl's favourite backstage mascara.

I hope that this helped choosing the write mascara.

-Sophie

Brushes...Brushes...Brushes

Brushes...Brushes...Brushes...
So many brushes for so many purposes. I have put together a few tips on different makeup brushes, that I am sure that you will love. Here we go :


Foundation Brush

imageDesigned to achieve a smooth and flawless finish, the bristles are tightly packed with a tapered tip for fluid application. Dampen the brush first in warm water and firmly squeeze the excess into a towel or tissue, this will help achieve a more even distribution. You can also blend any brush strokes as you go with a damp natural or wedge sponge.

Concealer/Camouflage Brush

imageA soft bristled, flat brush with a wider base and a pointed tip. Use to apply concealer under the eyes, to spots and to camouflage problem areas such as broken capillaries and areas of discolouration.

Bronzer/Powder Brush

imageSoft, full and rounded, this brush can be used for both compact powder and bronzer. The bristles pick up the perfect amount of colour and distribute flawlessly onto the skin. Load your brush with the powder and shake away any excess before sweeping onto the skin.


Angle Eye Shadow Brush

image

A long, round and tapered brush perfect for shading the eye socket. Just gently follow the natural crease of the socket blending back and forth to build up depth of colour.

Flat Eyeliner Brush

imageAllows eyeliner to be applied deep into the lash line for a richer and more distinct eye. Gently brush upwards to soften and blend the line for a smokey eye.

Blending Eye Shadow Brush

image

Use this light brush to blend eye colours and to highlight the brow bone.

This is just a small part of the brush collection, how about you Click Here for the rest of the makeup brushes.

-Sophie

Everyday Waves

Here is a video for them everyday waves...

Golden Days

Look at Lauren Conrad's style at the InStyle party! You like it ? Well now you can try it, below are the secrets to how she had her hair and makeup that night !
 
Hair:
Lauren’s dress has a simple twist in front and so it's nice to use that as the feeling for the hair. Everything is rope twists (2 pieces instead of 3 like a braid) and pinned into a low chignon shape.

Makeup:
Is there a more perfect place to wear glitter than to the InStyle party? I think not! But understated glitter of course. First you should use the nude shade on her lid + crease and the chocolate shade on your lower lash line, then you dab the glitter shade all over your lid using your ring finger to deposit the glitter. Next wing the top lash line with black liquid liner and follow with two coats of mascara and 8 individual lashes on each eye.  Then finish the look with a peach cheek + shimmery nude lip gloss.

-Sophie.

How To Wear:Midi Skirt

Today I am going to teach you how to wear the newest trend in skirt style: Midi skirts! Designers including Rodarte, Celine, Prada and Louis Vuitton featured them on their spring 2012 ready-to-wear catwalks making tea length skirts all the rage for winter and spring. The trend was originally popularized in the early 1970s as fashions transitioned from flower power to seventies sleek. As always, fashion has repeated itself and the midi is the must-have piece for 2012. I've put together a few tips on how you can master wearing the midi skirt...


  1. Consider your height. If you are short, stick to a skirt that hits just above or below the knee. For taller ladies, any length will do so long as it doesn’t go below your ankles.
  2. Length is everything! You can totally ruin the midi look if your skirt is just 2 inches too long or too short. Ideally, you want a midi to hit mid shin, where you leg begins to thin out. If a skirt hits at the thicker part of you leg, it will make you look stalky. If need be, get it hemmed to an appropriate length. Trips to the tailor are always worth it!
  3. Perfect pairings. If you wear a bold color midi, temper it with a neutral blouse. As for pleated or fuller options, keep the top simple. I like to wear my midi with a silk button down, a knotted crewneck sweater, or a closer fitting top.

Blow Drying Your Bangs

  Below is a step by step plan on how to blow dry your bangs the proffesional way :

  1.  Always blow out your bangs while your hair is super wet. The sooner you blow dry them out of the shower, the better the result will be. Hair is most cooperative and flexible before it air dries.
  2. Using  your blow dryer with the nozzle attached, and a paddle brush, shift everything all the way to one side. Make sure to get warm air into the root. That will help you manipulate any unwanted “cowlicks”.
  3. Next, use your paddle brush to shift everything to the opposite side. Make sure you’re giving it a good push in the opposite direction.
  4. Split the bangs in half horizontally and clip the top half up.
  5. Using a medium to large sized round brush, smooth the bottom layer of your bangs out. Instead of curling them under, smooth all the way through the ends and point the nozzle toward the tip of the bangs as you see in the photo! Trick: the closer you keep the brush to your forehead and the less curling under you do, the less volume they will have. The more you lift the bangs and the more you curl under, the more volume you will have.
  6. Repeat the same motions with the top layer.
  7. Take the paddle brush and shift the bangs from left to right once more  to smooth everything out. Spray lightly with hairspray if desired.

Nailed It

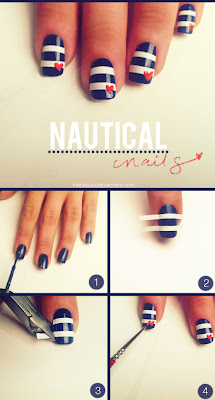
AHOY, friends!! We found a fun new way to do NAUTICAL! We used the straight strips that come in this french manicure kit to make our stripes! Might be one of the easiest nail art manicures ever! Painting stripes can be a big challenge, but this is pretty simple…

1. Paint the base navy blue.
2. Next, apply the white strips from the Using small scissors or cuticle nippers, clip the strips as close to the edge of your nail as possible.
3. Use a thin paint brush to create hearts on the nail wherever you want.
4. Last but not least, apply your top coat!
Enjoy your Wednesday everyone!!

-Sophie and Mollie

Tuesday 24 January 2012

Work Style


Check out Kim Kardashian's new style. Would you ever wear anything like this to work? She definitely suits this very well. Why not get a pair yourself, look at these black high waisted pants from new look for only £19.99. Click Here for the website.

-Sophie.

Welcome

Hello and welcome to my new blog, Daily Dose. I hope that you will enjoy reading my posts as much as I will love updating them. This blog will include great fashion tips, hair styles, makeup ideas and the latest showbiz news. As this is my first post I would like to share a picture.

-Sophie